Craft a Beautiful Planted Aquarium

Aqua Design Amano USA creates the finest products for planted aquarium.

Go shopping

Product Categories

How to Create a Beautiful Planted Aquarium

takashiamanoaquascape

Creating beautiful fish aquariums is easier than it might look! Follow this step-by-step guide from the master, Takashi Amano in order to aquascape your own gorgeous planted aquarium. Here’s how to create your own layout in 7 easy steps!

1. Set Up Your Fish Aquarium!

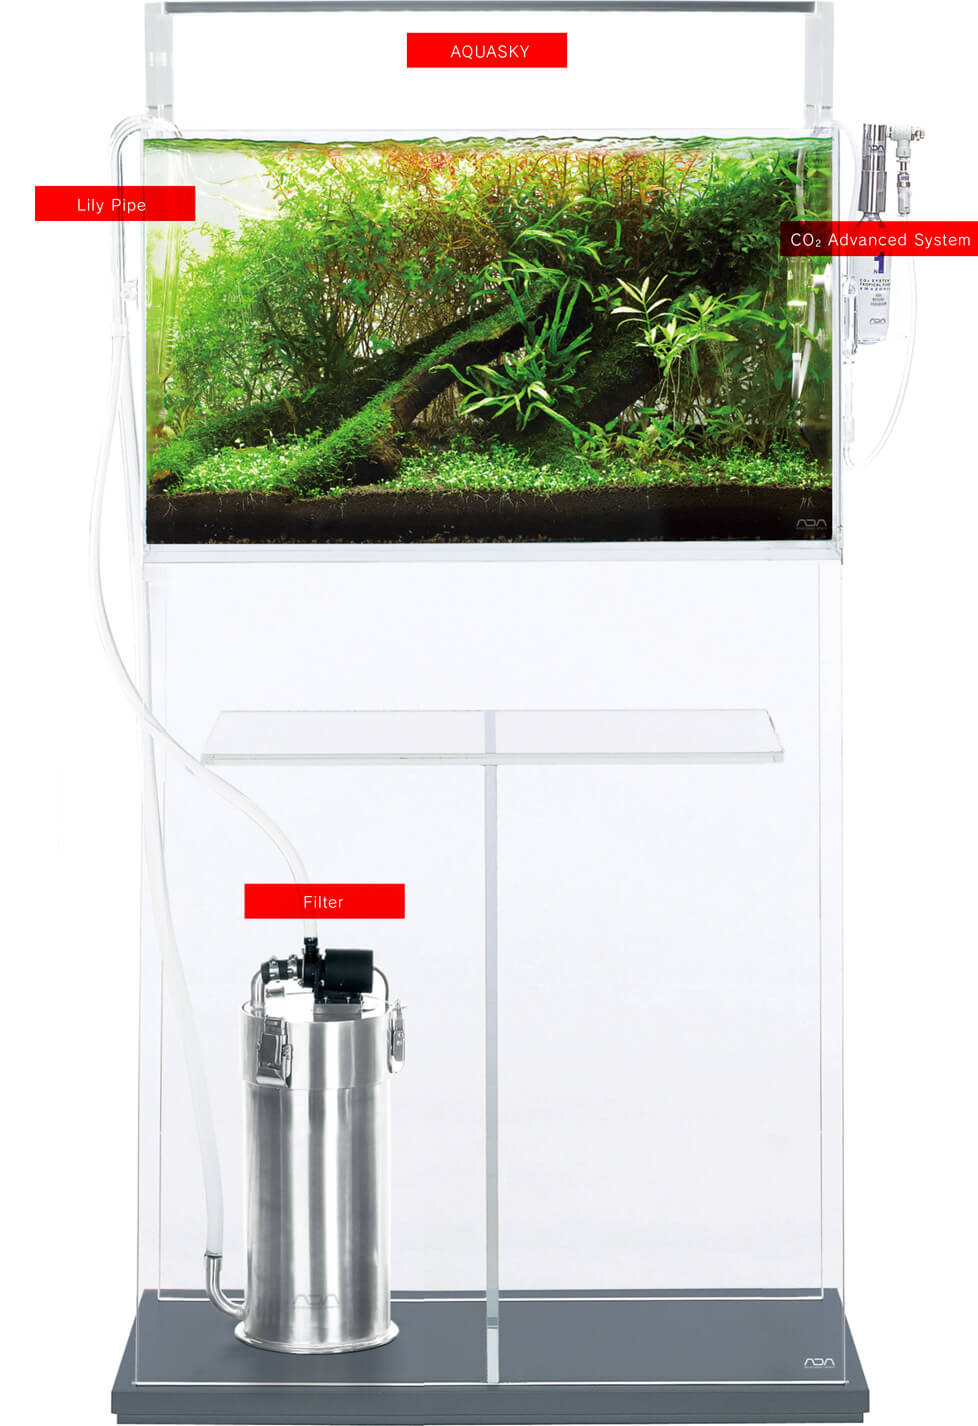
We suggest starting out with Cube Garden 60P, as the dimensions lend itself well to aquascaping, and the aquarium volume (15 gallons) is easy to maintain.

gardenmatplacement
Place Garden Mat underneath the aquarium to protect the glass of Cube Garden and the surface the aquarium is sitting on.

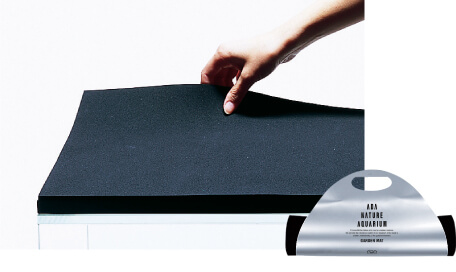
Using Garden Mat helps maintain the longevity of the aquarium by protecting the glass underneath the aquarium. The mat grips the bottom surface of the cube garden and helps prevent slippage from accidental bumping from people.

Once you’ve placed your garden mat, place the cube garden evenly over the top of the garden mat and make sure the aquarium is level. Making sure that your fish tank is on an even, level surface helps to maintain it’s structural integrity over the long term.

cubegarden60p
Your aquarium should now look like this after placement on top of garden mat.


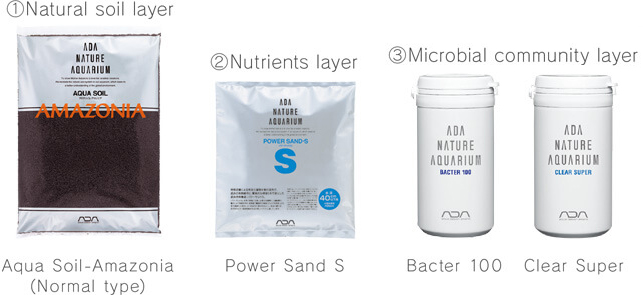
2. ADA’s Aquarium Substrate For Growing Aquatic Plants

In the planted aquarium, a live substrate system is important for healthily growing plants. Without a nutrient-rich substrate the aquatic plants will not thrive. ADA’s vision is to create an environment where the roots of aquatic plants develop a symbiotic relationship with the naturally occurring bacteria and microorganisms.

Organic compounds in the substrate layer become broken down and create inorganic compounds, which eventually become food for aquatic plants via absorption from the roots. A “living” substrate simply means that the substrate is not only rich in nutrients but also rich in bacteria life, which enhances the health of aquatic plant roots.

adasubstratesystem
Substrate additives such as Bacter 100, Clear Super and Tourmaline BC are placed on the bottom of the aquarium, next covered by Power Sand, and finally Aqua Soil acts as the top layer.

aquariumsubstrateproducts

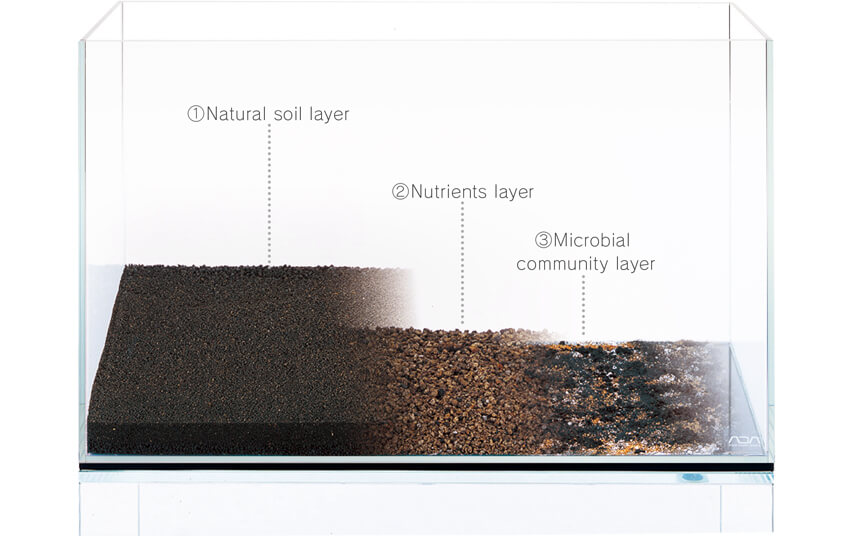
After you’ve placed the substrate into the aquarium, use a tool like sand flattener to smoothen out the substrate. To create depth in the aquascape, you will want to slope the substrate so that it is deeper in the back than it is in the front. This makes the layout appear to be much larger than it actually is once you begin to add aquarium decor and aquatic plants. Make sure you straighten out the soil in the front of the aquarium, because otherwise once plants grow in the aquarium, the layout will appear crooked.

smoothsubstrate

3. Using Aquarium Decor (hardscape materials) to Make the Framework of the Layout.

 Aquarium driftwood serves as the skeletal structure of a good aquascape. The most important thing is to make sure that the driftwood is resting in a stable position so that it does not shift or fall over while in the aquarium. Take care to position the driftwood in a pleasing direction to the left or right of the fish aquarium. Do not worry too much about being overly complex with your driftwood layout, simple structures become the most aesthetically pleasing!
Classic Driftwood Layout Compositions
convexdriftwoodlayout
Convex Driftwood Layouts are the most challenging of the three classic layout types. Good balance between left and right is crucial, never place driftwood directly in the center, always keep it at 2/3rds to the left or right.
concavedriftwoodlayout
Concave hardscape using driftwood is the most popular type of layout, just make sure that you leave plenty of open space in the middle.
triangledriftwoodlayout
With the triangle layout style, make sure to leave plenty of open space to either the left or right of the driftwood. The objective is to create a right angled triangle.


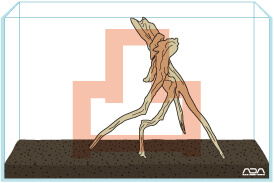
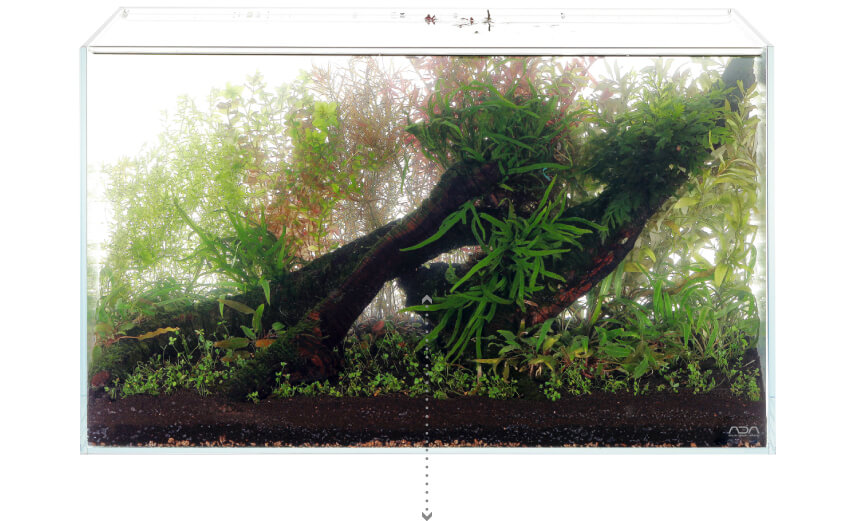
For this layout, we’re going to use a triangular aquascape using ADA Horn Wood as the driftwood material.

aquariumdriftwoodplacement
Three pieces of ADA Horn Wood are used to create this triangular layout. Before final placement of the driftwood, tie aquatic moss to the driftwood to enhance it’s appeal (shown in the next step).

4. Start Planting Your Fish Aquarium!

Pulling off elaborate aquascapes can be a challenge without the proper planning. When you prepare aquatic plants properly and begin to plant in stages, the process becomes fun and easy.

First, in the driftwood layout, begin by attaching aquatic mosses, such as java moss or christmas moss to the driftwood.

tyingmosstodriftwood

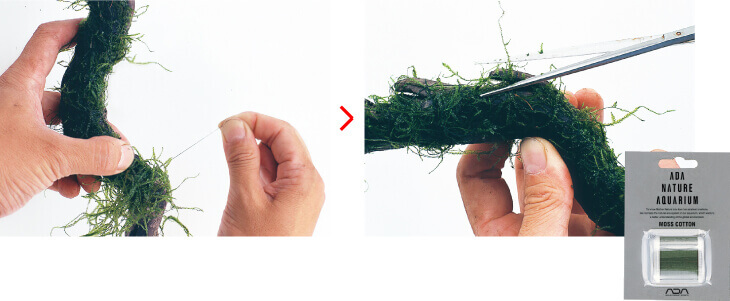
First, make sure the moss that you use is damp so that it sticks to the driftwood easily, then using ADA Moss Cotton, tie your aquatic moss down to the limb of the driftwood as shown. It is only necessary to tie moss to the side of the driftwood which is showing. Once you have tied moss to the driftwood, use a pair of trimming scissors to cut off any excess moss. Don’t worry, this will encourage the moss to grow back thicker and more aesthetically pleasing!

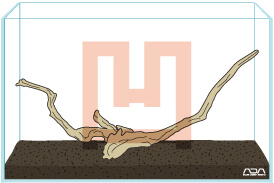
Once you have tied your moss to the driftwood, place the driftwood into the aquarium in the way you wanted it, such as shown at the end of step 3. Next, we’ll begin planting the foreground, starting planting from the front of the tank and working our way to the background is easier as you develop an image for the layout.

Beginning the Preparation for Planting Carpeting Plants

separatingcarpetplants
To make planting easier and so the carpeting plants spread quicker, make sure to divide them properly. First remove rock wool from the roots of the plants. Then divide into clumps. Finally create small bunches with 5-6 nodes each that can be easily gripped by pinsettes for planting.

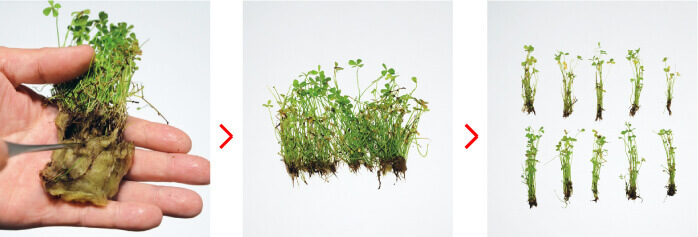
For this layout, we’re using Marsilea augustifolia, or dwarf four leaf clover plant for our carpet plant. You can use the same methodology shown above for other carpeting plants, such as Glossostigma and Hemianthus Callicthroides (HC).

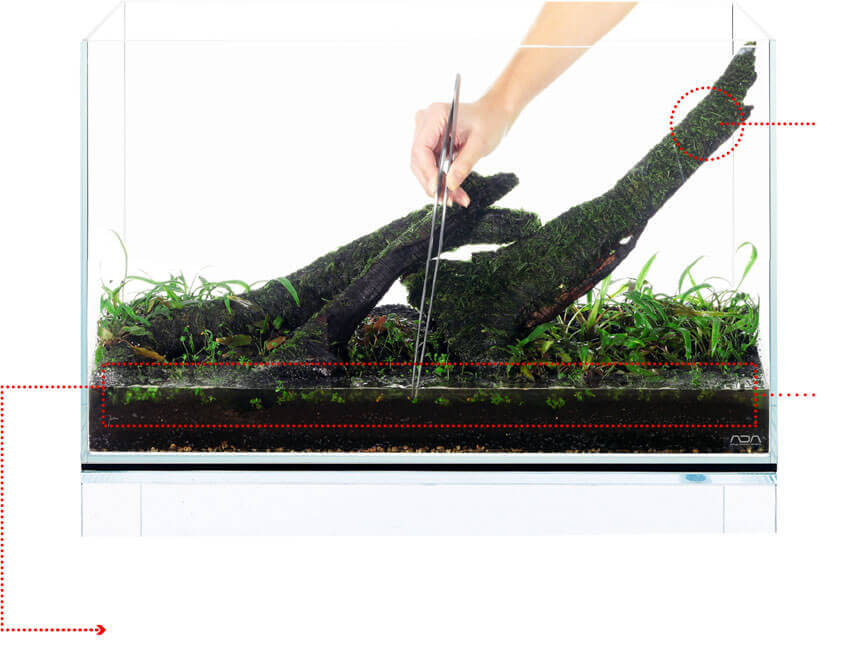
Once you have finished preparing your carpet plants, fill the aquarium with water up to the front soil level (shown in last photo in this section). This makes it much easier to plant the aquatic plants. Be careful and slowly fill the aquarium with water so as to not disturb the aqua soil. Many aquarists use either a spray bottle (in smaller aquariums) or place a plate on the soil and slowly pour water over the plate to ensure that the soil is not disturbed.

plantingcarpetplantswithpincettes
When planting carpet plants, plant them at an angle as shown in the picture so that the small aquatic plants stay put in the soil after filling. Use fine tipped pinsettes to easily grip your clumps of plants and place in the aqua soil.


plantingforeground
The red dotted square shows where we plant the foreground carpeting plants, and the red dotted circle shows the aquatic moss tied to driftwood.

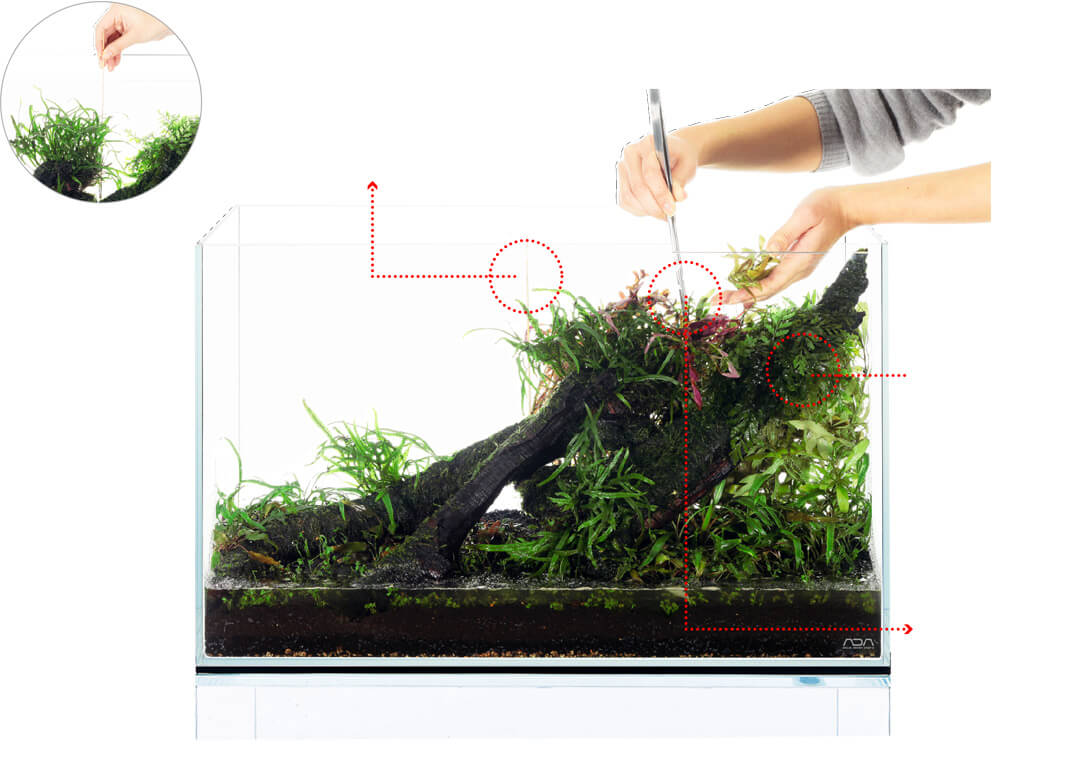
5. Planting the Midground Aquatic Plants.

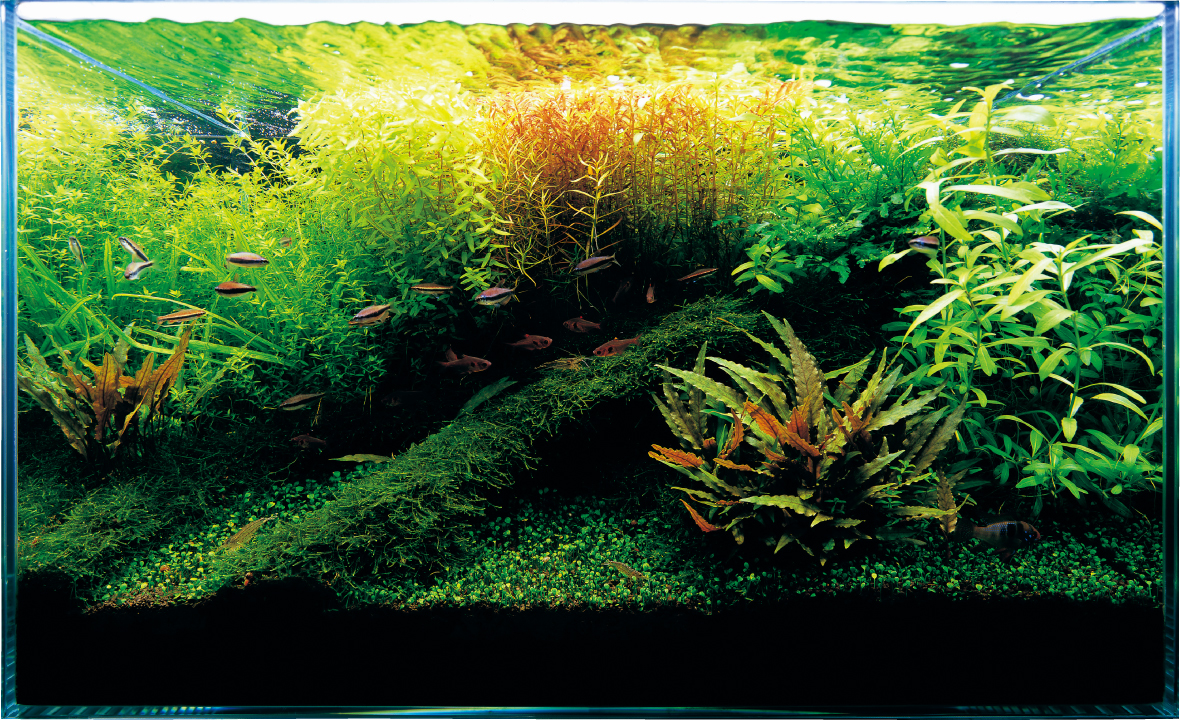
Moving on to the middle of the aquascape, the next section of plants will be medium sized plants that help define the transition between the front and back of the layout and aid in creating depth. At the end of this process, the layout will look like this:

attachingferns
We’re going to use Cryptocoryne albida, Cryptocoryne Wendtii (brown) and Cryptocoryne becketii va petchii (shown in the lower right hand circle) planted in the soil, and attach Microsorum trident (lower left hand circle) and Bolbitus heudelotii (upper right hand circle) to the driftwood to create depth.

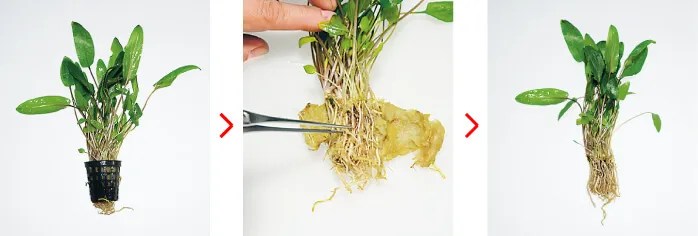
Cryptocoryne species planted in the midground also help to conceal the bottom portion of stem plants which will go into the background. The process for preparing cryptocoryne is similar to carpeting plants:

plantingcryptocoryne
Roots growing through the pot is a sign of a healthy plant. Once you’ve finished removing the pot, remove rock wool carefully from the roots using pinsettes so as to not damage the roots of the plant. Make sure to not plant with rock wool still attached, as it will rot in the aquarium. Once all the rock wool is separated, you may divide the plant into two or three bunches.

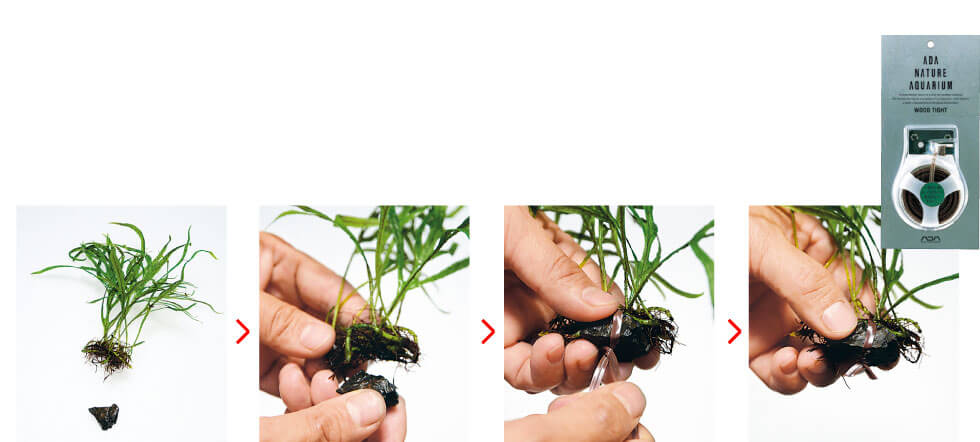
Finally, we’ll prepare epiphytic plants, such as Bolbitus, Java Fern and Anubias to attach to the driftwood. These kinds of plants do not grow in soil, but rather attach themselves to objects like rock and driftwood and absorb their nutrients from the water.

attachingjavaferntostone
Use a small stone that can easily be hidden by the plants roots, which we’ll tie the Bolbitis to. Cover the stone with the roots, then use ADA wood tight to fasten the aquatic plant to the stone. Attach firmly and cut off the excess wood tight. Your plant is now ready to be placed onto driftwood.

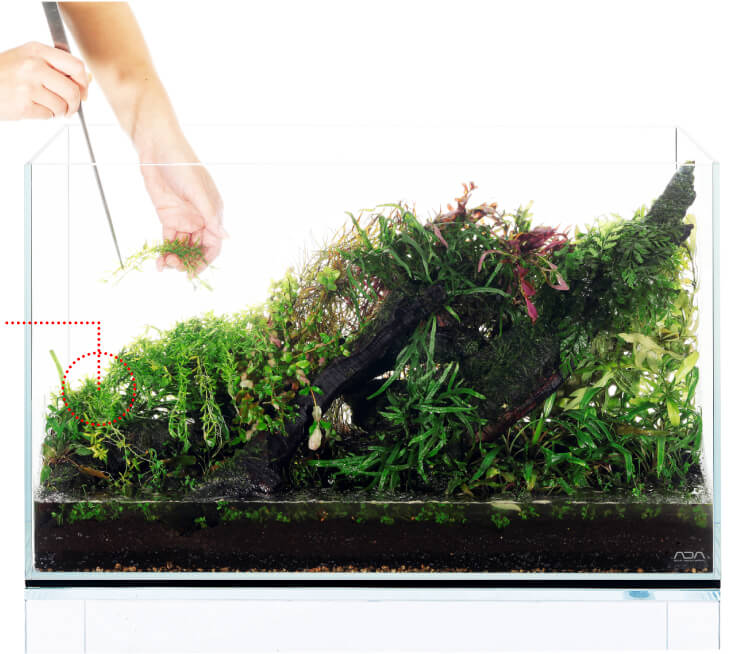
6. Finishing the Planting of the Layout with the Background

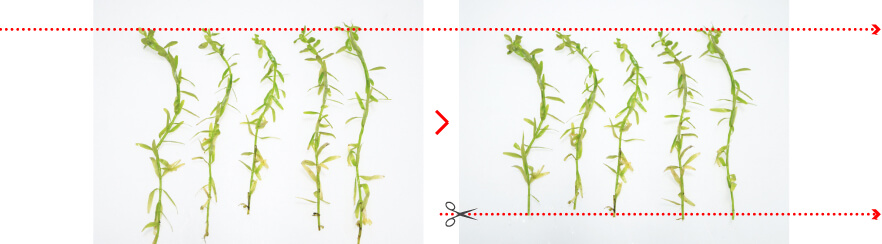
Tall growing stem plants are ideal for the background of the layout, with the remaining area, we’re going to complete the look of the layout with this. To properly prepare stem plants:

cuttingstemplants
When preparing stem plants, cut the base of the stem plants so that each one is uniform in height. Apply this to all stem plants you will be using so they grow at the same rate.


plantingstemplantsdirection
In the back of the aquarium, plant the stem plants at an angle, starting from the middle towards the corner of the aquarium so it is easy for you to keep planting densely. Use red stem plants at the focal point of the aquarium to draw attention to the most interesting area of the layout.
plantingbackgroundplants
In the right hand circle area, Hygrophila polysperma, Ludwigia arcuata, Rotala macrandra (Green) and Rotala indica is planted, with red colored plants like Rotala Indica at the central red circle (the focal point of the aquarium at the 2/3rds mark). It may be easier for you to use a bamboo stick to mark where you will plant which species (shown in the third red circle to the left).
plantinghemianthusmicranthemoides
Finally, plant hemianthus micranthemoides (a thinner stemmed plant that grows in bunches) on the left hand side of the aquarium. This completes the planting of your aquascape!

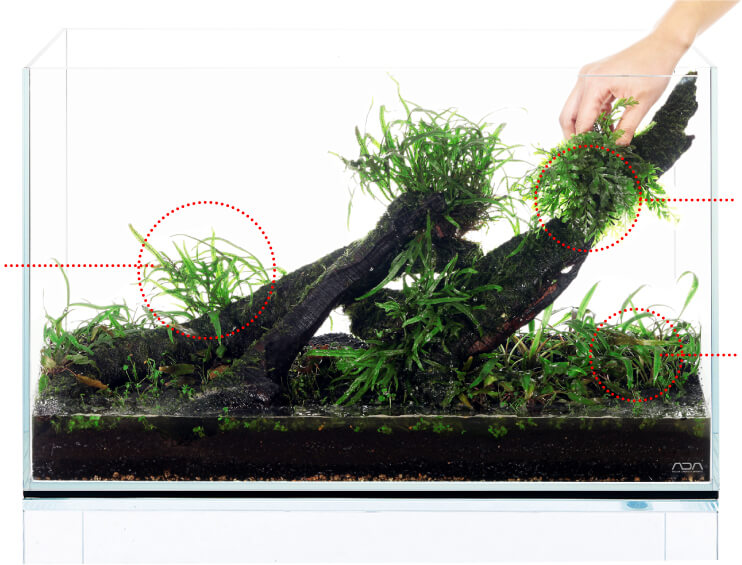
7. The Finished Setup of Your Planted Aquarium!

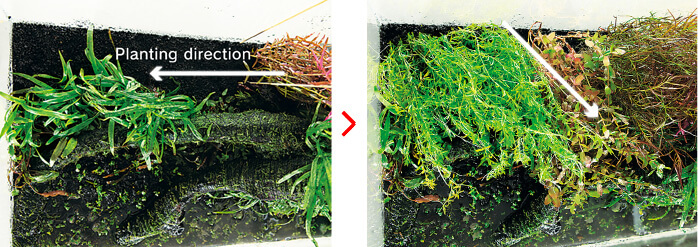
Gently pour water over the aquarium until the tank is full. Your aquarium should now look something like this:

fillaquariumwithwater

plantedaquariumequipment
Once filling is complete, attach Aquarium Co2 System (ADA Advanced System), Aquarium LED (AQUASKY 601) and Aquarium Filter (Super Jet ES300 or ES600), and the beginning of your layout has begun!

Recent Products

  • Placeholder

    Cube Cabinet Clear 30W

    $308.00
    Add to cart
  • adaglasscover

    Glass Cover

    $9.95$22.95

    Glass Cover

    Clean cut with beveled edges and sized specifically for each cube garden, Glass Covers fit on top of the aquarium tank and prevent fish from jumping out of the fish tank or unintended objects from getting in!

    Select the size best suited for your Cube Garden. Hooks for attaching glass covers to the aquarium come included for free with every Cube Garden aquarium tank.

    Select options
  • adasuperjetes600

    Super Jet Filter

    $409.00$600.00

    Super Jet Filters

    The world’s highest quality aquarium filter: made entirely out of stainless steel and using an iwaki pump, the Super Jet series is a complete set for any aquarium size.

    Read More
  • adanacarbon

    Filter Media NA Carbon

    $19.95

    NA Carbon Filter Media

    NA Carbon’s signature ability is it’s ability to absorb toxins in the water at a rate about 20 times higher than other conventional carbon used in aquariums. The cylindrical design of NA Carbon promotes additional absorption as water flows through it in the canister filter.

    Add to cart

On sale Products